MAPPINGS for this Tutorial: mappings channel: 'snapshot', version: '20210309-1.16.5'To add a custom item in Minecraft you actually don’t need that many things. One JSON file, one texture file and some code in a new class. Optionally you can also choose to create a new class for the item, but you only need to do this for special items which might have additional functionality. We will not be doing that in this article.
Making ModItems Class
First of all we’ll start with adding a new package and a new class inside of it. Right click on your tutorialmod package and click new > Package and we’re gonna name it item. Like this in lower-case please. This is a Java convention!
Right clicking on our new item package we’ll go new > Java Class and name it ModItems. This is the class where all of our custom items will be registered!
The first thing we want to inside the ModItems class is a DeferredRegister which is basically a “list” in which we register all of our items.
    public static final DeferredRegister<Item> ITEMS
            = DeferredRegister.create(ForgeRegistries.ITEMS, TutorialMod.MOD_ID);
We also need to add a static method which we will call inside of our TutorialMod class.
    public static void register(IEventBus eventBus) {
        ITEMS.register(eventBus);
    }
This will make sure the items we add are actually registered and Minecraft then knows about them! This register method is going to be called inside the constructor of the TutorialMod Class like this:
    public TutorialMod() {
        IEventBus eventBus = FMLJavaModLoadingContext.get().getModEventBus();

        ModItems.register(eventBus);
Make sure that the IEventBus has been extracted to a variable inside the constructor like above. Then you are good to go.
Adding our first Item
We will only need one line to add an item. This is the line:
    public static final RegistryObject<Item> AMETHYST = ITEMS.register("amethyst",
            () -> new Item(new Item.Properties().group(ItemGroup.MATERIALS)));
I’ll explain it in detail. The variable type is RegistryObject<Item>. Almost all things you’ll add are gonna be “held” inside of RegistryObjects. You will be able to access the Item class by calling the .get() method on it, so don’t worry. The name of our variable will be all upper-case. This is the convention in Minecraft, you don’t necessarily have to follow it, although it is advised.
We then call the previously defined DeferredRegister with ITEMS.register. The register method allows us to define a new item. It takes in two parameters the first o which is a string. This will be the name of your item. You could also call this the item id. It must be a unique identifier, so you cannot have different items have the same name. The second parameter is a supplier of type Item. Therefore we need to return a new Item.
Item.Properties
The Item constructor takes in Item.Properties which can also be created there by simply calling new Item.Properties() as seen above. The important thing with Item.Properties is that it follows the builder pattern. A powerful design pattern which gives you multiple ways of building the same object. In this case, multiple ways of building an item.
With the dot operator we can call a lot of different methods on the Item Properties:
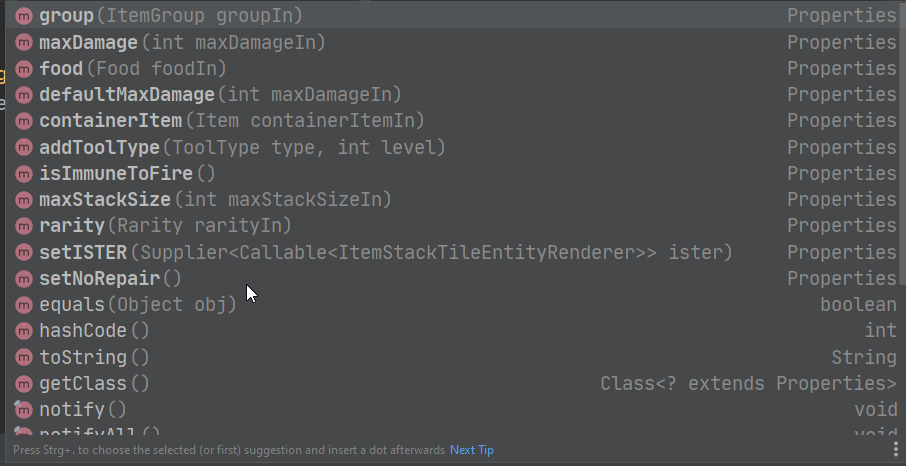
We’ll not go through these right now, for us only .group is interesting. This defines in what ItemGroup the item is shown inside the Creative Menu. Like seen above, we’ll choose ItemGroup.MATERIALS. After we have added the RegistryObject variable to our ModItems class, we are done with the code. We now only need to add some JSON files and a texture!
Adding JSON Files
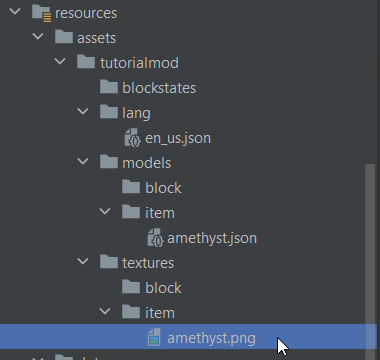
Firstly, we want to add a language file so our Item has a proper name. If we were to start the game right now, the item would have a black and pink texture and would be called item.tutorialmod.amethyst. Inside of our resources > assets > tutorialmod > lang folder we will create a new file by right-clicking > New > File > en_us.json
The .json is very important! Do not forget that! The contents of which should currently look like this:
{
  "item.tutorialmod.amethyst": "Amethyst"
}
The lang JSON files are basically translation key-value pairs that allow you to translate text into multiple language with minimal overhead. The key in this case is item.tutorialmod.amethyst and the translated value is Amethyst, which will now be displayed in the game. Note that this will now happen in the US English version for Minecraft which should be the default language when you runClient.
Item Model JSON
We will also need to add an item model JSON, so the game know how to display the item correctly. For that we will add a new JSON file under resources > assets > tutorialmod > models > item > amethyst.json:
{
  "parent": "item/generated",
  "textures": {
    "layer0": "tutorialmod:item/amethyst"
  }
}
It is important that the name of the file is exactly the same as the name given to our item inside the ModItems class. If something does not work, double check that you haven’t made a typo!
Now onto a rough explanation of the item model JSON. Parent determines how the item gets rendered inside the inventory, hand and the world.
item/generated is the “default” way with no special features for rendering. Just a 3D representation of the 2D Item textures, which you should be used to.
textures are a “list” of directories which point to particular textures.
layer0 as the name suggests is the 0-th layer. This basically need the path to the texture. We start with our MOD_ID then a colon and after it you can think of ourselves inside the textures folder. We need to add the file path to our texture. In this case it points to textures > item > amethyst.png
Don’t forget to add the Texture File
Therefore don’t forget to add the texture file as well (Download is available at the bottom of the article):
Starting the game you should see this in the miscellaneous creative tab:
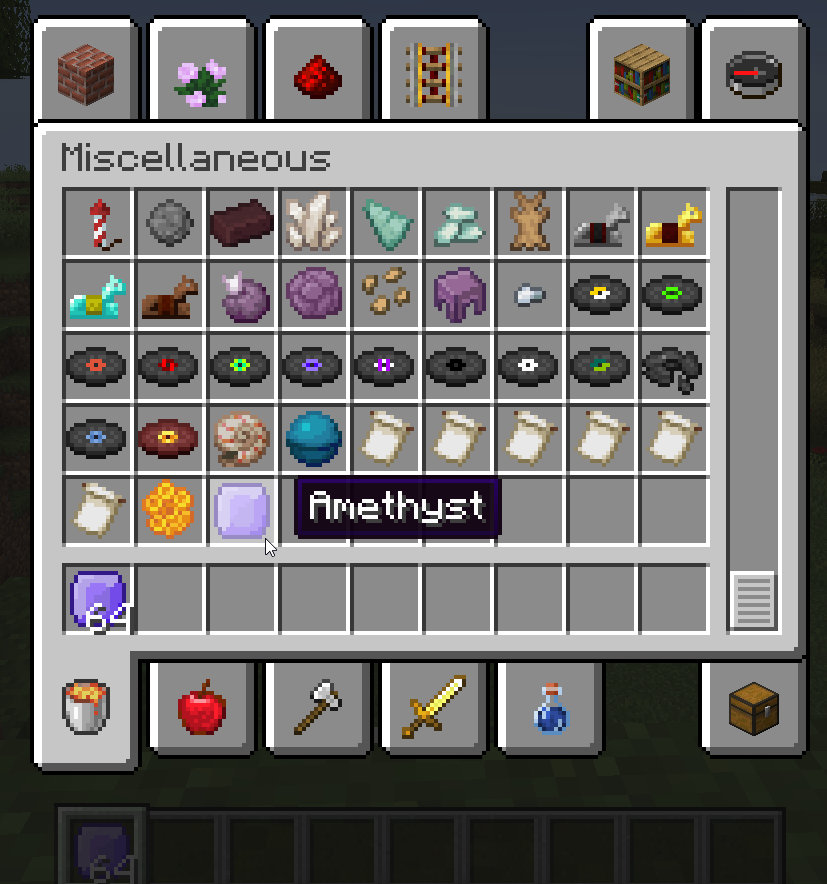
So you have successfully added the Item. Congratulations. Any other Item is basically the same as that! There are techniques on how to make more advanced items, but we’ll cover those in a later post and video.
Common Errors or Mistakes
“The texture of my Item is black and pink?”
This happens if the item model JSON cannot be found or the texture specified inside of it is not found. The most likely cause is a misspelling of a folder or the a file name. Double and triple-check every name including the one inside the JSON file and the one given inside the ModItems class. Also make sure your folders are named properly like in the Forge Folder Structure post!
“The texture show up, but the name is wrong?”
Then there must be an issue with the lang folder or the en_us.json file. Also make sure you are on English (US) for your language (at least for testing purposes). The name of the key in the JSON file looks like this item.tutorialmod.amethyst item dot your Mod Id dot name given to the item in the ModItems class. Make sure you don’t have typos in there. It can be easy to miss. Also make sure the format of the file is correct, you can take a another look at it here:
{
  "item.tutorialmod.amethyst": "Amethyst"
}
You can add new entries like this:
{
  "item.tutorialmod.amethyst": "Amethyst",

  "item.tutorialmod.another_item": "Another Item"
}
Just a comma and then the next translation key-value pair. Make sure you do not have a trailing comma at the end. The JSON will be invalid then and it won’t work!
Download the files
GitHub Repo: https://github.com/Tutorials-By-Kaupenjoe/Minecraft-1.16.5/tree/3-newItem
All files as Gists: https://url.kaupenjoe.net/yt6/gist
amethyst.png: https://url.kaupenjoe.net/yt6/textures
All Assets zipped: https://url.kaupenjoe.net/yt6/assets
Was this helpful?
36 / 3
[…] The characters inside the pattern are represented by a key which references an item. There once again you need to specify a ResourceLocation. So your ModId or “minecraft” if it is a vanilla item followed by colon and then the name of the item; the one you define in your ModItems class. […]
[…] at one example of an advanced item in Minecraft. It is more complex and require more code than just adding a custom item without any additional […]
Hi
Ruby I love you
Dad