When it comes to making Advanced Items, the first thing you’ll need is a good idea what it is supposed to do. We’re going to take a look at one example of an advanced item in Minecraft. It is more complex and require more code than just adding a custom item without any additional functionality.
I will also show you how you can look up some vanilla mechanics so you can easily “copy” them over and use similar mechanics in your mod. Without further ado, let’s begin!
The Idea
The item we are creating is called a Firestone. You can right click a block with it and you can use it 8 times before it breaks. 50% of the time, no matter what block you right click, you are lit on fire! The other 50% of the time, if it is the correct block (in our case obsidian and this would be expandable) then you gain fire resistance for 10 seconds. If it was the wrong block you light the ground on fire.
We will be coding this in a clean manner – at least to the best of my own abilities. I’m no master in this, but I’m trying my best – and you should too! Let’s move on to creating the Item.
Creating the Item
Making a new Class
Instead of just making adding another new Item inside of our ModItems class, we need to make a new class which extends Item. I personally think this should be inside of another package. So I created a new package under item called custom. This is optional, because package management is something you (and possibly your team) need to be concerned with!
public class Firestone extends Item {
    public Firestone(Properties properties) {
        super(properties);
    }
}
When you add extends Item to the class you are greeted with an error. Hover over the error and click Create constructor matching super. Like below.

The way you can implement “advanced” features works a little like this. The Item class from Minecraft has methods which you can override. Those methods are called when certain events happen in game. For example: you right click with the item in hand or you to toss the item out of your inventory. You can middle mouse button on Item in your class and it should open the vanilla Item class. You can then also middle mouse button click on IForgeItem for even more method you can override.

Overriding Item Methods
In this tutorial, we’ll be using an override onItemUseFirst method. This method is from the IForgeItem and is called “when the item is used, before the block is activated.” So this method is called before any right click happens for the block. To see what methods are available you can either go through the IForgeItem and Item class and you can also type in override into your custom advanced Item class and you should see suggestions like this:
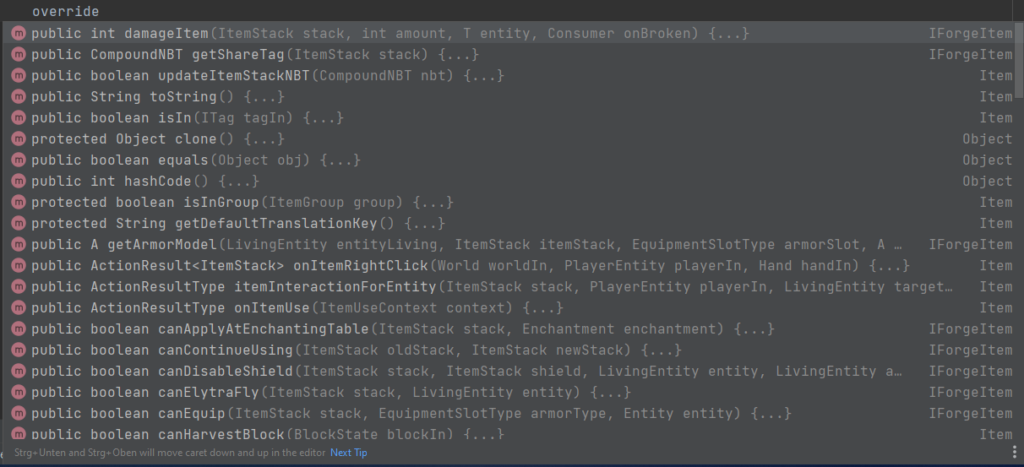
As you can clearly see… there are a lot. This is only the beginning. It is by far the be best to just try out some of them. Usually the naming of these methods is pretty intuitive.
onItemUseFirst Implemented
If you wish to skip the explanation for each of the methods used, you can skip to here, to see the entire Firestone class.
    @Override
    public ActionResultType onItemUseFirst(ItemStack stack, ItemUseContext context) {
        return super.onItemUseFirst(stack, context);
    }
This is the generated method. The first thing we need here is the world.
    @Override
    public ActionResultType onItemUseFirst(ItemStack stack, ItemUseContext context) {
        World world = context.getWorld();

        return super.onItemUseFirst(stack, context);
    }
We can get the world by using the ItemUseContext. It contains much useful information for us! All the additional code we’re writing is inside the following if statement:
        if(!world.isRemote) {

        }
The reason we need to ask for this is so that we only execute the code on the Server Thread. For the time being, without getting in to too much detail, we want the code to only execute on the Server if we spawn items, change blocks in the world or do anything of note that a client shouldn’t be able to do. A better explanation of the Client-Server architecture of Minecraft will come in the future when it is ready.
    @Override
    public ActionResultType onItemUseFirst(ItemStack stack, ItemUseContext context) {
        World world = context.getWorld();

        if(!world.isRemote) {
            PlayerEntity playerEntity = Objects.requireNonNull(context.getPlayer());
            BlockState clickedBlock = world.getBlockState(context.getPos());

            rightClickOnCertainBlockState(clickedBlock, context, playerEntity);
            stack.damageItem(1, playerEntity, player -> player.sendBreakAnimation(context.getHand()));
        }

        return super.onItemUseFirst(stack, context);
    }
And this the entire onItemUseFirst method. Let’s go through line-by-line inside the if statement. Firstly, just to make it a bit cleaner and easier to read, we make two local varaiables of the PlayerEntity and the BlockState which is the block inside the world that we clicked.
You will probably note the Objects.requireNonNull call where we pass the player from the context. The reason for this is that the getPlayer on the ItemUseContext is nullable and should be checked for null before using it. Calling Objects.requireNonNull simply ensure that we throw an exception if the player is null instead of crashing the game outright.
After the two variables we have two method calls. The rightClickOnCertainBlockState is a method of my creation, which we’re going to implement shortly. And the stack.damageItem simply damages the item. As I have previously stated, the item has 8 durability until it breaks.
rightClickOnCertainBlockState
Let’s continue with this method. The name could maybe be improved, but I think in this instance it is fine.
    private void rightClickOnCertainBlockState(BlockState blockClicked, ItemUseContext context, PlayerEntity playerEntity) {
        boolean playerIsNotOnFire = !playerEntity.isBurning();

        // 50% of the time lights the ground on fire other time you get fire resistance
        if(random.nextFloat() > 0.5f) {
            lightEntityOnFire(playerEntity, 6);
        } else if(playerIsNotOnFire && blockIsValidForResistance(blockClicked)) {
            gainFireResistanceAndDestroyBlock(playerEntity, context.getWorld(), context.getPos());
        } else {
            lightGroundOnFire(context);
        }
    }
The entire method is also quite clear and concise. However, it does call a bunch of other methods we will also need to create. While it might be harder to “copy” it is much cleaner code and overall the contents of the method should be easily understood by people with some Java knowledge!
50% of the time we simply lightEntityOnFire which needs an entity and the number of seconds that it should burn for. Pretty easy stuff.
The other 50% we first check if playerIsNotOnFire. A boolean variable which I defined at the top of the method. I think playerIsNotOnFire is a more clear description than !playerEntity.isBurning(). The negating exclamation mark is easy to miss. This once again isn’t strictly necessary, but makes reading it easier and makes the code cleaner. It also checks if the block that was clicked is valid for resistance with the blockIsValidForResistance method call.
If the player isn’t on fire and the block is valid, the player is granted fire resistance and the block is destroyed. Pretty much exactly the name of the method that is called gainFireResistanceAndDestroyBlock. If the player is either on fire or the block is not valid, we just light the ground on fire. Now, let’s move onto each of the methods.
LightEntityOnFire
    public static void lightEntityOnFire(Entity entity, int duration) {
        entity.setFire(duration);
    }
Pretty easy just a call to entity.setFire. I choose to make a new static method with a slightly nicer name. Not necessary, but I think it reads a bit better. This static method can now also be used elsewhere in our Mod.
BlockIsValidForResistance
    private boolean blockIsValidForResistance(BlockState state) {
        return state == Blocks.OBSIDIAN.getDefaultState();
    }
Here we are just returning whether the state given is a particular block. In this case Obsidian. If you choose to have many valid blocks, you should probably make a Set inside the Item and see if the given BlockState is contained in that. For a couple of items you can also just add more comparisons chained by the OR operator.
GainFireResistanceAndDestroyBlock
    private void gainFireResistanceAndDestroyBlock(PlayerEntity playerEntity, World world, BlockPos pos) {
        gainFireResistance(playerEntity);
        world.destroyBlock(pos, false);
    }
The gainFireResistanceAndDestroyBlock method might go against the idea that methods should only do “one thing” but I think in this case it is fair to do these two together. The method remains private and non-static, because I do not believe I would ever use it elsewhere. It is specific to the Firestone as an item. This could of course be changed later.
GainFireResistance
    public static void gainFireResistance(PlayerEntity playerIn) {
        playerIn.addPotionEffect(new EffectInstance(Effects.FIRE_RESISTANCE, 200));
    }
However, the gainFireResistance method is interesting enough so that it should be static. One possible refactoring might involve also passing the time as a parameter for the effect. Especially if the method is to be used elsewhere.
LightGroundOnFire
This method was adapted from the FlintAndSteelItem class.
    public static void lightGroundOnFire(ItemUseContext context) {
        PlayerEntity playerentity = context.getPlayer();
        World world = context.getWorld();
        BlockPos blockPosForFire = context.getPos().offset(context.getFace());

        if (AbstractFireBlock.canLightBlock(world, blockPosForFire, context.getPlacementHorizontalFacing())) {
            world.playSound(playerentity, blockPosForFire, SoundEvents.ITEM_FLINTANDSTEEL_USE, SoundCategory.BLOCKS,
                    1.0F, random.nextFloat() * 0.4F + 0.8F);

            BlockState blockstate = AbstractFireBlock.getFireForPlacement(world, blockPosForFire);
            world.setBlockState(blockPosForFire, blockstate, 11);
        }
    }
I won’t go into detail on this method, but suffice to say, it simply spawns a fire block if the location is valid for it.
Entire Firestone Class
If you didn’t want to read through every single method, here is the entire working Firestone class:
public class Firestone extends Item {
    public Firestone(Properties properties) {
        super(properties);
    }

    @Override
    public ActionResultType onItemUseFirst(ItemStack stack, ItemUseContext context) {
        World world = context.getWorld();

        if(!world.isRemote) {
            PlayerEntity playerEntity = Objects.requireNonNull(context.getPlayer());
            BlockState clickedBlock = world.getBlockState(context.getPos());

            rightClickOnCertainBlockState(clickedBlock, context, playerEntity);
            stack.damageItem(1, playerEntity, player -> player.sendBreakAnimation(context.getHand()));
        }

        return super.onItemUseFirst(stack, context);
    }

    private void rightClickOnCertainBlockState(BlockState blockClicked, ItemUseContext context, PlayerEntity playerEntity) {
        boolean playerIsNotOnFire = !playerEntity.isBurning();

        // 50% of the time lights the ground on fire other time you get fire resistance
        if(random.nextFloat() > 0.5f) {
            lightEntityOnFire(playerEntity, 6);
        } else if(playerIsNotOnFire && blockIsValidForResistance(blockClicked)) {
            gainFireResistanceAndDestroyBlock(playerEntity, context.getWorld(), context.getPos());
        } else {
            lightGroundOnFire(context);
        }
    }

    private boolean blockIsValidForResistance(BlockState state) {
        return state == Blocks.OBSIDIAN.getDefaultState();
    }

    private void gainFireResistanceAndDestroyBlock(PlayerEntity playerEntity, World world, BlockPos pos) {
        gainFireResistance(playerEntity);
        world.destroyBlock(pos, false);
    }

    public static void lightGroundOnFire(ItemUseContext context) {
        PlayerEntity playerentity = context.getPlayer();
        World world = context.getWorld();
        BlockPos blockPosForFire = context.getPos().offset(context.getFace());

        if (AbstractFireBlock.canLightBlock(world, blockPosForFire, context.getPlacementHorizontalFacing())) {
            world.playSound(playerentity, blockPosForFire, SoundEvents.ITEM_FLINTANDSTEEL_USE, SoundCategory.BLOCKS,
                    1.0F, random.nextFloat() * 0.4F + 0.8F);

            BlockState blockstate = AbstractFireBlock.getFireForPlacement(world, blockPosForFire);
            world.setBlockState(blockPosForFire, blockstate, 11);
        }
    }

    public static void gainFireResistance(PlayerEntity playerIn) {
        playerIn.addPotionEffect(new EffectInstance(Effects.FIRE_RESISTANCE, 200));
    }

    public static void lightEntityOnFire(Entity entity, int duration) {
        entity.setFire(duration);
    }
}
Overall, I’m pretty happy with it. Advanced items can become quite complicated and therefore making sure your code is clean and readable is a high-priority. Don’t just put everything into the onItemUseFirst method. That is usually pretty bad practice if it is more than a few lines.
Adding the advanced Item to our ModItems class
Of course we still need to register our Item. How do we do this, you might ask. Easy enough:
    public static final RegistryObject<Item> FIRESTONE = ITEMS.register("firestone",
            () -> new Firestone(new Item.Properties().group(ModItemGroup.TUTORIAL_GROUP).maxDamage(8)));
Instead of creating a new Item like before, we simply create a new Firestone. The class we just made. Also do not forget to add the item model JSON file:
{
  "parent": "item/generated",
  "textures": {
    "layer0": "tutorialmod:item/firestone"
  }
}
And the texture is available at the bottom of the article.
Testing our advanced Item
Now… Let’s see if it works!
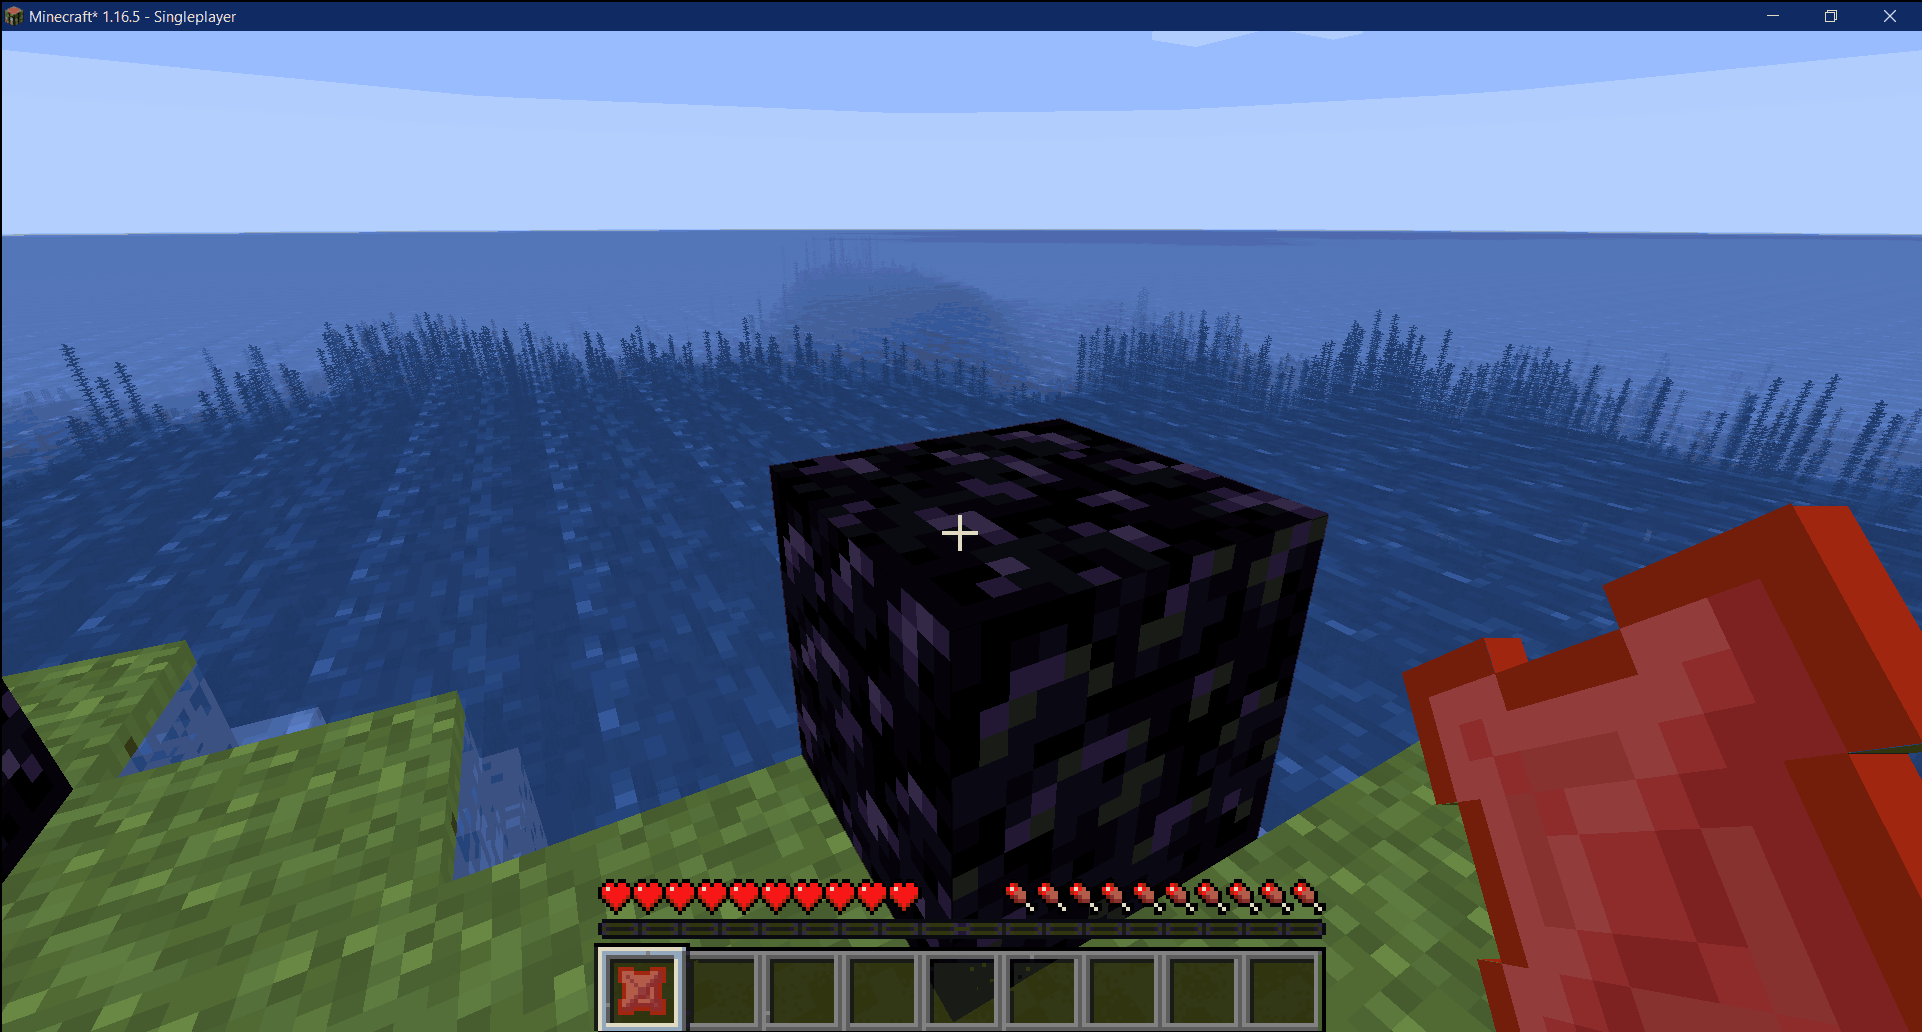
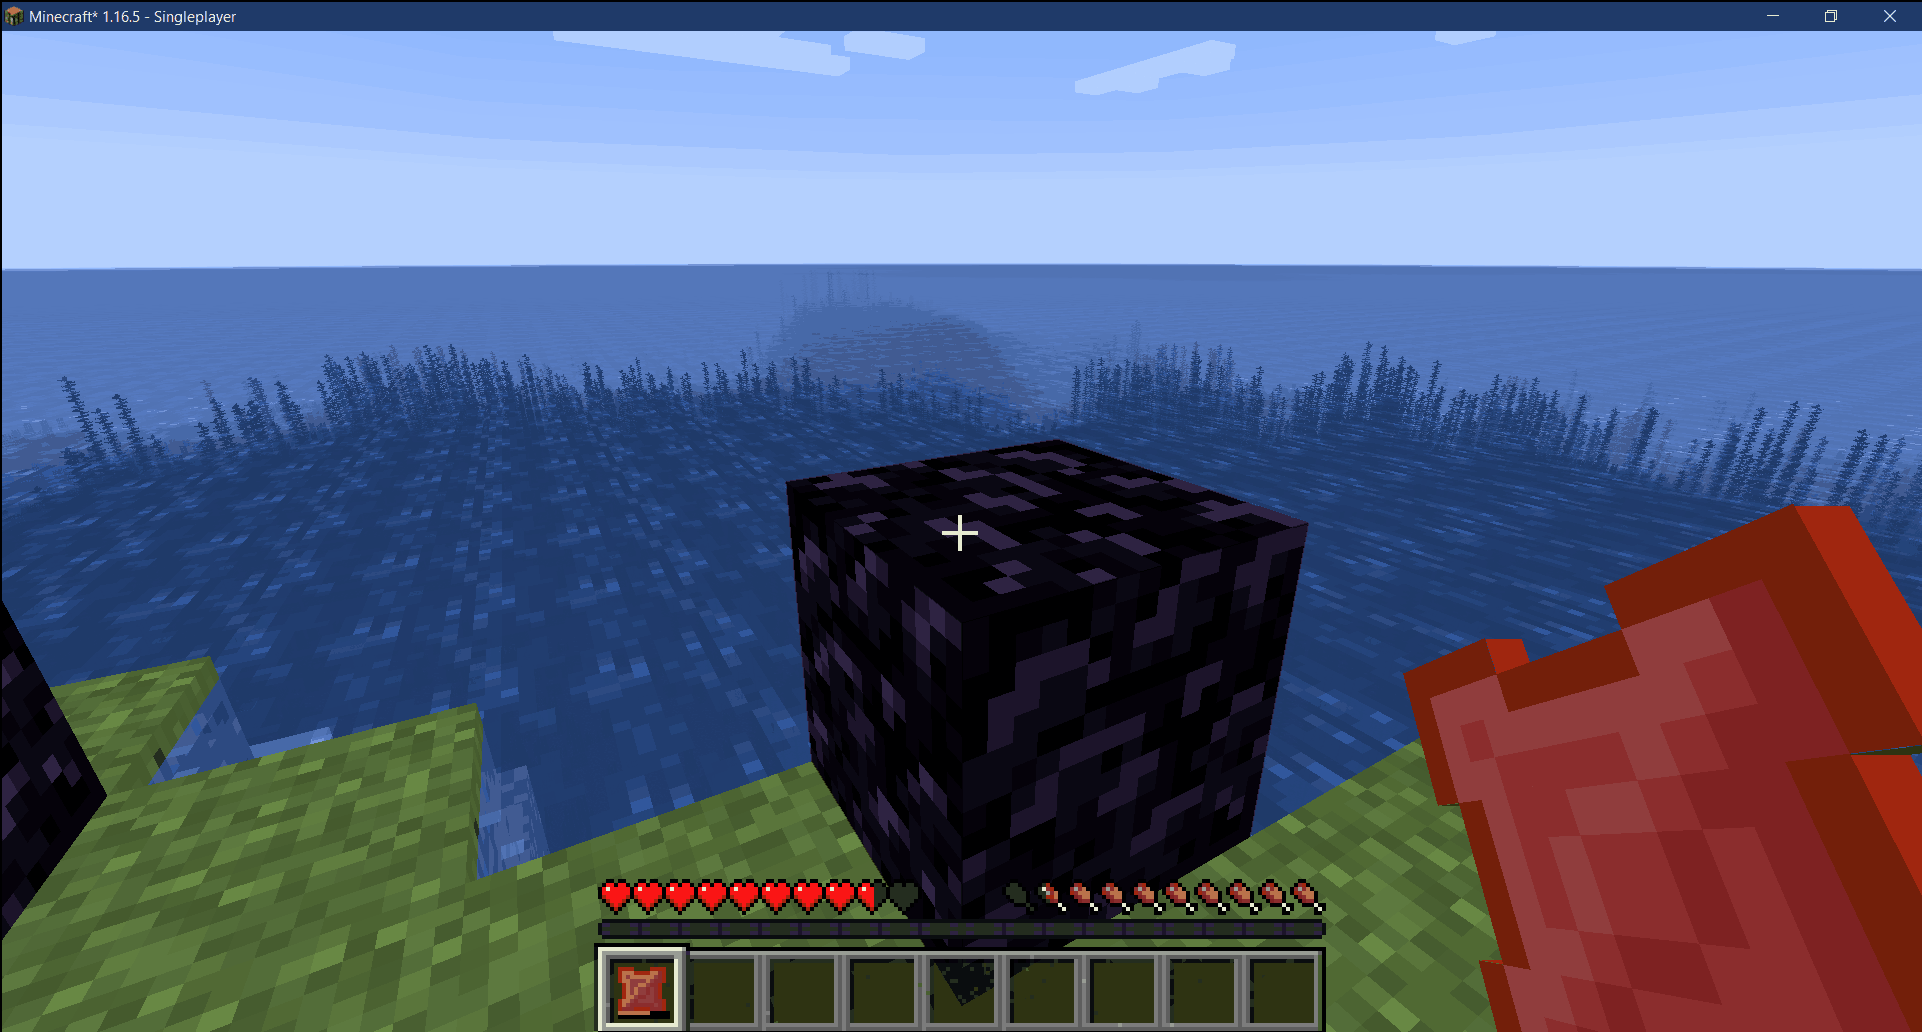
So everything seems to be working great!
Summary
As you can clearly see, adding an advanced item is way more complex than just adding a new ingot or block that don’t do much. You really need to plan out what advanced items you want to add to your mod, before just jumping in and coding away. The more complex the functionality, the more more complex the item class will be. And also remember to keep your code clean. Especially if you are working with multiple people!
For more modding videos be sure to also check out my YouTube channel!
Downloading the assets
GitHub Repo: https://github.com/Tutorials-By-Kaupenjoe/Minecraft-1.16.5/tree/7-advancedItem
Gists: https://url.kaupenjoe.net/yt14/gist
Firestone.png: https://url.kaupenjoe.net/yt14/textures
All Assets zipped: https://url.kaupenjoe.net/yt14/assets
Was this helpful?
13 / 2
[…] advanced blocks is very similar to adding advanced items. You will need to extend the Block class from Minecraft and override certain methods to achieve […]