Making advanced blocks is very similar to adding advanced items. You will need to extend the Block class from Minecraft and override certain methods to achieve particular functionality.
The Idea
In this case, we’re going to make a much simpler “advanced” Block, but in addition to our simple functionality, I will show you the two most asked about methods for the block – left clicking and right clicking a block.
The idea of our advanced block is going to be, if you walk on it, you get lit on fire. That’s it. Nothing too fancy, but still a cool functionality to have.
Creating the Advanced Block
Making a new Class
Instead of making a new Block inside the ModBlocks class, we’ll first need a custom class of our own.
public class FirestoneBlock extends Block {
    public FirestoneBlock(Properties properties) {
        super(properties);
    }
}
And easily enough we have a new custom Block class, now let’s add some methods we can override. If you want to know how to see which methods can be overridden, you can take a quick look at the advanced Item tutorial where I explain how to do it detail. As quick reminder, you can simply type in override in to your newly created class and you’ll get all the methods we can override suggested.
onEntityWalk
To facilitate our functionality, we’ll be using the onEntityWalk method which is called each time an entity walks on an instance of that advanced block. Then we just need to lit that entity on fire. Luckily, we have already done some work in that area and have defined a static method in the Firestone which can do that. So our method looks like this:
    @Override
    public void onEntityWalk(World worldIn, BlockPos pos, Entity entityIn) {
        Firestone.lightEntityOnFire(entityIn, 5);
        super.onEntityWalk(worldIn, pos, entityIn);
    }
That’s actually all we need for our desired functionality of lighting entity on fire when they walk on the block. If you have not followed the previous tutorial, you can also replace the static call with this:
entityIn.setFire(5);I personally think that reading lightEntityOnFire is a bit nice, but everyone has their preferences 🙂
Right Click Method for Blocks
What now is the method that is called when I right click blocks?
It is: onBlockActivated. It gets called four times, once on the Server and once on the Client and once for each hand of the player. Make sure to check the !world.isRemote() if you want to do anything on the Server – like changing block or dropping items.
In this example we’ll just output something to the console. Let’s see how that method looks:
    @SuppressWarnings("deprecation")
    @Override
    public ActionResultType onBlockActivated(BlockState state, World worldIn, BlockPos pos, PlayerEntity player, Hand handIn, BlockRayTraceResult hit) {
        if(!worldIn.isRemote()) {
            if(handIn == Hand.MAIN_HAND) {
                System.out.println("I right-clicked a FirestoneBlock. This is called for the Main Hand! D:");
            }
            if(handIn == Hand.OFF_HAND) {
                System.out.println("I right-clicked a FirestoneBlock. This is called for the Off Hand! D:");
            }
            return ActionResultType.SUCCESS;
        }
        return ActionResultType.PASS;
    }
The @SuppressWarnings("deprecation") is added so the name isn’t crossed out. You can use the method even though it is marked as deprecated. This is only a important for calling the method, but not for overriding them. So even deprecated methods in the block and item class can be overridden, just do not call them from anywhere!
As you can see, we are basically checking if we’re on the Server and then outputting something a bit different depending on what hand the method has been called for. It’s now really easy to add functionality to it, like checking what Item the Player is holding.
Left Click Method for Blocks
    @SuppressWarnings("deprecation")
    @Override
    public void onBlockClicked(BlockState state, World worldIn, BlockPos pos, PlayerEntity player) {
        if(!worldIn.isRemote()) {
            System.out.println("I left-clicked a FirestoneBlock!");
        }
    }
Very similar to the onBlockActivated method, we’re going to need to check whether we’re on the Server or not. Then we can add some functionality to it.
The entire FirestoneBlock Class
public class FirestoneBlock extends Block {
    public FirestoneBlock(Properties properties) {
        super(properties);
    }

    @SuppressWarnings("deprecation")
    @Override
    public ActionResultType onBlockActivated(BlockState state, World worldIn, BlockPos pos, PlayerEntity player,
                                             Hand handIn, BlockRayTraceResult hit) {
        if(!worldIn.isRemote()) {
            if(handIn == Hand.MAIN_HAND) {
                System.out.println("I right-clicked a FirestoneBlock. This is called for the Main Hand! D:");
            }
            if(handIn == Hand.OFF_HAND) {
                System.out.println("I right-clicked a FirestoneBlock. This is called for the Off Hand! D:");
            }
            return ActionResultType.SUCCESS;
        }
        return ActionResultType.PASS;
    }

    @SuppressWarnings("deprecation")
    @Override
    public void onBlockClicked(BlockState state, World worldIn, BlockPos pos, PlayerEntity player) {
        if(!worldIn.isRemote()) {
            System.out.println("I left-clicked a FirestoneBlock!");
        }
    }

    @Override
    public void onEntityWalk(World worldIn, BlockPos pos, Entity entityIn) {
        Firestone.lightEntityOnFire(entityIn, 5);
        super.onEntityWalk(worldIn, pos, entityIn);
    }
}
Registering the Block and adding the JSON files
As with all other blocks or items, you will need to register everything inside the ModBlocks class and add the relevant JSON files as well. At this point, you should know how this works. Here’s a quick refresher, if you need it. And for the Firestone Block, here is a quick overview.
Addition to the ModBlocks class:
    public static final RegistryObject<Block> FIRESTONE_BLOCK = registerBlock("firestone_block",
            () -> new FirestoneBlock(AbstractBlock.Properties.create(Material.IRON)
                 .harvestLevel(2).hardnessAndResistance(6f).harvestTool(ToolType.PICKAXE).setRequiresTool()));
Blockstates JSON:
{
    "variants": {
        "": { "model": "tutorialmod:block/firestone_block" }
    }
}
Block Model JSON:
{
  "parent": "block/cube_all",
  "textures": {
    "all": "tutorialmod:block/firestone_block"
  }
}
Item Model JSON:
{
    "parent": "tutorialmod:block/firestone_block"
}
en_us.json:
"block.tutorialmod.firestone_block": "Firestone Block",As you can see all just standard stuff 🙂
The Block texture is of course available for download at the bottom of the article! Now, let’s see if it worked?!
Seeing if it works

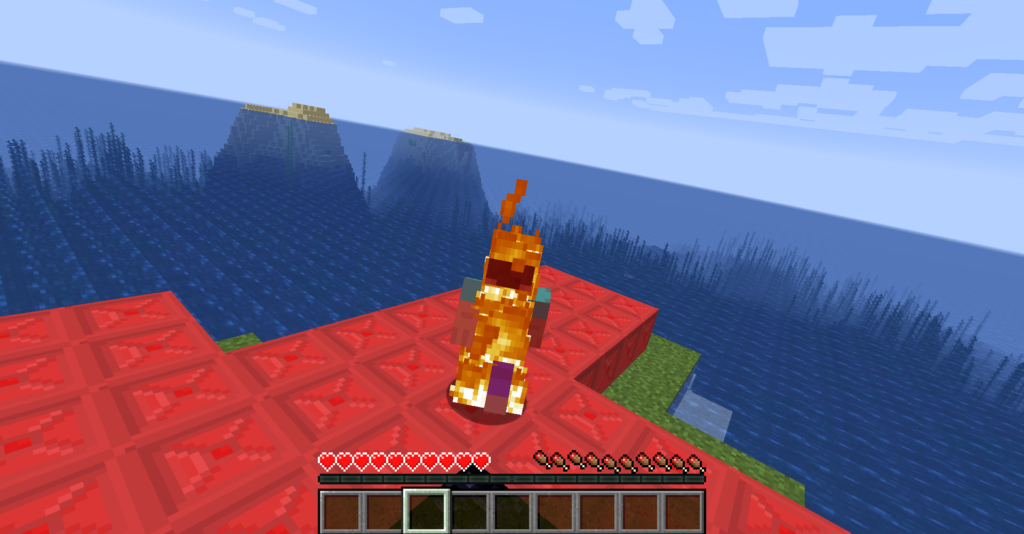
As you can see walking on the block has lit me on fire. And when I right click and left click the block you can see output below:

Summary
So that’s all you need to do in order to add advanced blocks to Minecraft with Forge. While the amount of methods available for override can be pretty overwhelming, it is something that you slowly can work you way towards. Just keep adding you ideas and soon you’ll have a small and simple Mod ready to go.
Assets for Download
WIP
Was this helpful?
20 / 0
Great tutorials! Thanks for all your work on this!